


Congratulations on deciding to use Text-Em-All as your mass messaging platform! Breathe a sigh of relief and know that you’re in good hands - we’re here to help you with anything you might need, and we’ll ensure your messages get to the right people quickly.
But now what? You’ve decided on the platform, and the hard work is over, but how do you set yourself up for success going forward?
Luckily, with Text-Em-All, it’s not difficult, and we’ve laid out all the steps you need to take to make sure you can use your account to the fullest. Enjoy!
1). Set up Audio or Text Templates to be ready for emergencies
Emergencies happen in the blink of an eye, and it pays off to be prepared. Setting up audio and/or text templates for different types of emergencies will save you valuable time in the event of an actual emergency.
To set up a Text Template
- Navigate to Message Library > Text Library.
- Click Add Template.
- Give your template a name and content.
Read more about Text Templates.
To set up an Audio Template
- Navigate to Message Library > Audio Library.
- Click Record a Message.
- Record your message and give your recording a name.
- Click Save to Library when finished.
Read more about Audio Templates.
2) Set up auto-replies and keywords
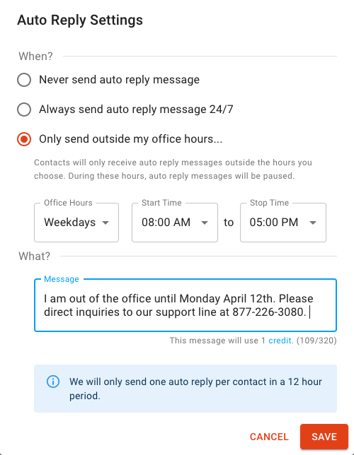
Timely and efficient communication is key to keeping your organization in good standing with your contacts, but what happens when you’re unavailable? You can avoid leaving your contacts unmonitored with our auto-replies feature.
This automation allows you to set up text auto-replies permanently or for a set period of time, and allows you to constantly stay in touch with your contacts. You can also set up survey auto-replies, in which our system will automatically determine who responded “Yes” or “No” to your question and send the auto-reply you created.
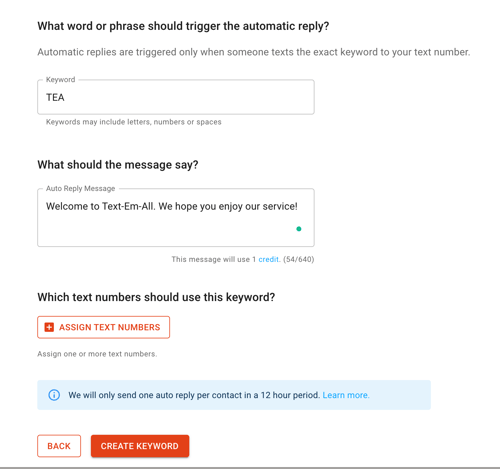
Another useful automation feature is our "keywords" function. Keywords help you engage your contacts by creating a memorable word or phrase that they can text to you. The keyword will trigger an automatic message that you create.
Auto-replies and keywords are only available to our Pay-As-You-Go customers.
To set up auto-replies
- Navigate to Automation > Auto Replies.
- Click Add an Auto Reply.
- Choose when to send the auto reply.
- Type your message.
- Click Save.
To set up keywords
- Navigate to Automation > Keywords.
- Click Add a Keyword.
- Type your keyword.
- Type your message.
- Next, select a text number to assign the keyword to.
- Click Create Keyword.
3) Set up your contacts/groups
Adding your contacts to your account and segmenting your contacts by groups can help you save time when sending broadcasts.
To add contacts to your account, simply visit the Contacts tab on your account, or add them to your account when you create a broadcast.
While everyone can access the contacts section of their account, this feature is especially useful for monthly accounts, as these types of accounts are often sending messages to the same group of contacts every time.
Read more about managing your contacts.
4) Set up users to help you send messages
One of the perks of having a Text-Em-All account is that you can add unlimited users for free. If you’re working with a team, we recommend that one of the first things you do is add your team to the account.
To add users, go to your account settings and click on the Users tab. From here, you can assign them a role and access to a text number. This is a great way to let your team send messages while also limiting what contacts or broadcasts they can see. Here you can also choose whether or not they can make purchases for the account.
Read more about adding users to your account.
5) Set up voice or text phone launch
By setting up voice or text phone launch, you can still send a message even if you don’t have access to the internet. This is helpful for power outages and mass messaging on the go.
To enable Text Phone Launch
- Navigate to your Text Settings tab on the Settings page.
- Click Set Up Text Phone Launch (if a mobile number is already entered, click ‘Edit’ to change the number.)
- Enter your mobile number and click Save.
Read more about Text Phone Launch.
To enable Voice Phone Launch
- Navigate to Settings > Voice Settings page.
- Click on Setup Phone Launch under Broadcast Settings.
- Create a numerical Phone ID PIN.
- Click Setup.
Read more about Voice Phone Launch.
6) Set up notifications for replies
Stay updated on when your contacts are engaging with your broadcasts by setting up notifications for replies. This will ensure you never miss a response and can respond to your contacts in a timely fashion. There are three ways to be notified: text, email, and browser notifications.
If you do not plan on using your Text-Em-All account for responses, we suggest setting up an auto-reply to notify your customers that you do not respond to replies.
To set up notifications, navigate to your Account Settings and click the Notifications tab.
7) Add a profile picture if you will be using Text-Em-All as part of a team
Help your team know who you are within your Text-Em-All account by adding a profile picture. Adding a profile picture will make your image visible to team members in places throughout the app.
This feature is helpful for quickly figuring out who sent which broadcasts and who is in communication with each contact.
To add a profile picture
- Navigate to your account settings > Profile.
- Click Upload a Photo.
- Click Save.
Read more about adding a profile image.